Amos's Blog

大数据|容器化|♾️

0%

在 Airflow 的使用过程中,曾多次遇到令人惊奇的现象,其中之一便是它没有按照 dag 中的配置执行。

可能你也会遇到这样的情况,为什么配置了 schedule_intervalstart_date,但是依旧没有按照调度配置的时间自动执行。

举个栗子

比如我这么配:

1
2
3
4
5
6
7
8
9
10
11
12
from datetime import datetime, timedelta, timedelta

default_args = {
'owner': 'amos',
'depends_on_past': False,
'start_date': datetime.now(),
}

dag = DAG('test_rerun_dag',
default_args=default_args,
description='test_rerun_dag',
schedule_interval="*/1 * * * *")

照理说它应该按照配置中写的,每分钟执行一次操作。可是它没有,是它变心了吗?

不,不是的。

这究竟是为什么

Airflow sets execution_date based on the left bound of the schedule period it is covering, not based on when it fires (which would be the right bound of the period) .

原因在于 Airflow 是个有原则的程序,它有个窗口的概念,会把 start_date 开始后,符合 schedule_interval 定义的第一个时间点记为 execution_date,但是会在下个时间点到达时才开始运行。也就是说由于这个窗口的原因,last run 会滞后一个周期。

所以,按上面的配置来说,每次当 scheduler 读到了这段 DAG,它会拿小本本记下 start_date 和每分钟执行的操作,准备在下一分钟开始执行了。但是当下一分钟来临的时候,它看了看表,嗯!start_date + 1,那么 execution_date 也 + 1,于是把小本本上的 start_date 划掉重写。所以 start_date 在不断被覆盖的过程中,任务没有像我们预想中的在调度奔跑,反而一直是挂起状态。

这可咋整啊

那么如何才能真正地让它规律地执行呢?

将 start_date 往前错位到上一个周期

什么意思呢?假如本例中的每分钟执行一次,那就将 start_date 调整到上一分钟的状态

‘start_date’: datetime.now()

‘start_date’: datetime.now() - timedelta(minutes=1)

这下 scheduler 就可以在小本本工工整整地记录每一次调度计划,而不用写了划,划了写,把小本本涂得黑黑的了!


如果你的 dag 趁你不注意卡在running 状态下不能动弹,或许你可以改改调度时间或周期。

或者试试参考这篇文章:Airflow 居然趁服务器不注意卡在 running 状态不执行

有向无环图

Airflow 基于一个重要的数据结构,DAG。

为什么依赖 DAG?

LInux 与 WIndows 的 crontab 与任务计划,只可以配置定时任务或间隔任务,无法配置作业间的依赖关系。

一个很大的弊端是,如果我们需要在作业 A 执行之后才有供作业 B 执行的数据,而出现了不可因素导致轮到作业 B 执行的时候作业 A 还未执行完毕。这必定会导致数据缺失,或作业 B 执行失败。

所以,使用有向无环图来定义作业流,在任务调度中是非常合适的。

基础服务

Webserver

是 Airflow 的基础服务,提供了前端可视化管理工具,可视化才是最好的!

你可以在上面执行调度操作,查看任务处理耗时分析,清除状态作业重跑,查看日志,管理用户和数据连接,以及配置的 DAG 是否正确等。

Scheduler

也是 Airflow 的基础服务之一,身为调度器,负责监控 DAG 的状态,计算调度时间,启动满足条件的 DAG,并将任务提交到 Executor。

Worker

工作节点,这个角色类似于 yarn 中的 namenode,直接负责 Executor 的执行分配。

ps: yarn 为 hadoop 中的资源管理系统

Executor

Airflow 有三种执行器

  • SequentialExecutor

    顺序执行器,无需额外配置,默认使用 sqlite 作为元数据,因此也无法支持任务之间的并发操作。

  • LocalExecutor

    本地执行器,不支持 sqlite,但可使用 mysql、oracle、postgress 等主流数据库,需配置数据库链接 URL。

  • CeleryExecutor

    江湖人称芹菜,是一款基于消息队列的分布式异步任务调度工具,可将任务运行在千里之外(远程节点),十分优秀!

    ps: 需执行 Airflow 的工作节点 airflow worker

    pps: 需额外安装 RedisRabbitMQ

其他

Operators

有了作业流,就得有作业内容,Operators 就是做这事的。

Airflow 目前支持十多种不同的作业类型

  • BashOperator
  • PythonOperator
  • DockerOperator
  • DruidCheckOperator
  • EmailOperator
  • HiveOperator
  • HTTPOperator
  • DummyOperator
  • ……

他们的作用都像字面意思说的那样,可完成相应的操作或调用。

值得注意的是 DummyOperator,是个空操作,相当于标记和中转节点。

当然,他们有一个共同的爸爸「BaseOperator」,中央集权,他一人的修改会改变儿子们继承到的功能。

Timezone

在 1.9 版本及以前,Airflow 使用的是本地时间,不同服务器时区不同容易产生运行错误。

而在 1.10 中,加入了自定义的时区配置(1.9 的时区配置无法生效,大坑。。)

预警与监控

当任务执行失败或状态异常时,发送短信或邮件。

这是个棒棒的功能,守卫再严的城池也有失守的时候,硝烟一起,家书即刻送达。

你说,这为镇守襄阳城提供多少便利?

有啥用

Airflow 简单来说就是管理和调度各种离线定时的 Job,用以替代 crontab, 可以把它看作是个高级版的 crontab

如果 crontab 的规模达到百千万,管理起来会非常复杂。这个时候可以考虑将任务迁移到 Airflow,你将可以清楚地分辨出哪些 DAG 是稳定的,哪些不那么见状,需要优化。如果 DAG 不足以打动你,强交互性、友好的界面管理、重跑任务以及合适的报警级别足以让你感觉相见恨晚。

简单记录安装及配置过程

Airflow 在 1.8 之后更名为 apache-airflow

NOTE: The transition from 1.8.0 (or before) to 1.8.1 (or after) requires uninstalling Airflow before installing the new version. The package name was changed from airflow to apache-airflow as of version 1.8.1.

1
$ pip3 install apache-airflow

如果你想安装 1.8.0 的 Airflow

1
$ pip3 install airflow

初始化

1
$ airflow initdb

初始化后默认会在 ~/ 下生成 airflow 文件夹,如果想更换 MySQL 或其他数据库做为元数据存储,那么在配置文件中修改配置后重新初始化即可。

关于如何在 python3 中安装 MySQL,此处不做赘述。

1
2
$ vi ~/airflow/airflow.cfg
sql_alchemy_conn = mysql://username:password@host:port/airflow

安装扩展

Airflow 内置了芹菜的调度器,只需要手动安装芹菜并进行简单配置就可以使用。

Celery 可使用 RabbitMQRedis 做为 broker,按需选择即可,此处也不做赘述。

1
2
3
4
5
6
7
$ pip3 install apache-airflow[celery]

# 启用还需修改几处配置
$ vi ~/airflow/airflow.cfg
executor = CeleryExecutor
broker_url = redis://127.0.0.1:6379/0
result_backend = db+mysql://root:xxx@127.0.0.1:3306/airflow

这里有一个可能会踩入的小坑

既然项目更名了,在安装芹菜等扩展时,记得选对项目。

否则便会安装两个项目,导致后期使用出现冲突。

1
2
3
4
5
6
7
8
$ pip3 install apache-airflow
$ pip3 install airflow[celery]

$ pip3 list
...
apache-airflow (1.10.0)
airflow (1.8.0)
...

启动

1
2
3
4
5
6
# 启动 webserver
$ airflow webserver -p 8080
# 启动调度程序
$ airflow scheduler
# 启动 Celery
$ airflow worker

启动完成后就可以运行官方内置的 example 测试啦!

大坑

记录几个遇到的报错

airflow.exceptions.AirflowException: Could not create Fernet object: Incorrect padding

1
2
3
4
5
6
7
8
9
10
11
12
13
14
15
16
17
18
19
20
21
22
23
24
25
26
27
28
29
30
31
32
33
34
35
36
37
38
39
40
41
42
43
44
45
$ airflow initdb
[2018-10-30 15:30:26,857] {settings.py:174} INFO - setting.configure_orm(): Using pool settings. pool_size=5, pool_recycle=1800
[2018-10-30 15:30:27,164] {__init__.py:51} INFO - Using executor CeleryExecutor
DB: mysql://root:***@localhost:3306/airflow
[2018-10-30 15:30:27,320] {db.py:338} INFO - Creating tables
INFO [alembic.runtime.migration] Context impl MySQLImpl.
INFO [alembic.runtime.migration] Will assume non-transactional DDL.
Traceback (most recent call last):
File "/home/ubuntu/.local/lib/python3.5/site-packages/airflow/models.py", line 159, in get_fernet
_fernet = Fernet(configuration.conf.get('core', 'FERNET_KEY').encode('utf-8'))
File "/usr/lib/python3/dist-packages/cryptography/fernet.py", line 34, in __init__
key = base64.urlsafe_b64decode(key)
File "/usr/lib/python3.5/base64.py", line 134, in urlsafe_b64decode
return b64decode(s)
File "/usr/lib/python3.5/base64.py", line 88, in b64decode
return binascii.a2b_base64(s)
binascii.Error: Incorrect padding

During handling of the above exception, another exception occurred:

Traceback (most recent call last):
File "/home/ubuntu/.local/bin/airflow", line 32, in <module>
args.func(args)
File "/home/ubuntu/.local/lib/python3.5/site-packages/airflow/bin/cli.py", line 1002, in initdb
db_utils.initdb(settings.RBAC)
File "/home/ubuntu/.local/lib/python3.5/site-packages/airflow/utils/db.py", line 103, in initdb
schema='airflow_ci'))
File "<string>", line 4, in __init__
File "/home/ubuntu/.local/lib/python3.5/site-packages/sqlalchemy/orm/state.py", line 414, in _initialize_instance
manager.dispatch.init_failure(self, args, kwargs)
File "/home/ubuntu/.local/lib/python3.5/site-packages/sqlalchemy/util/langhelpers.py", line 66, in __exit__
compat.reraise(exc_type, exc_value, exc_tb)
File "/home/ubuntu/.local/lib/python3.5/site-packages/sqlalchemy/util/compat.py", line 187, in reraise
raise value
File "/home/ubuntu/.local/lib/python3.5/site-packages/sqlalchemy/orm/state.py", line 411, in _initialize_instance
return manager.original_init(*mixed[1:], **kwargs)
File "/home/ubuntu/.local/lib/python3.5/site-packages/airflow/models.py", line 677, in __init__
self.extra = extra
File "<string>", line 1, in __set__
File "/home/ubuntu/.local/lib/python3.5/site-packages/airflow/models.py", line 731, in set_extra
fernet = get_fernet()
File "/home/ubuntu/.local/lib/python3.5/site-packages/airflow/models.py", line 163, in get_fernet
raise AirflowException("Could not create Fernet object: {}".format(ve))
airflow.exceptions.AirflowException: Could not create Fernet object: Incorrect padding

fernet_key

关于 fernet_key 是什么,配置文件里给出了相应的解释:

Secret key to save connection passwords in the db

干掉它

1
2
3
4
5
6
7
8
9
10
11
12
13
14
# 生成一个 key 替换配置文件中的 fernet_key
$ python3 -c "from cryptography.fernet import Fernet; print(Fernet.generate_key().decode())"

$ vi ~/airflow/airflow.cfg
fernet_key = g3589dfasdfhnht289tghdsfij---dfadfgeu812=

$ airflow initdb
[2018-10-30 15:31:21,159] {settings.py:174} INFO - setting.configure_orm(): Using pool settings. pool_size=5, pool_recycle=1800
[2018-10-30 15:31:21,464] {__init__.py:51} INFO - Using executor CeleryExecutor
DB: mysql://root:***@localhost:3306/airflow
[2018-10-30 15:31:21,620] {db.py:338} INFO - Creating tables
INFO [alembic.runtime.migration] Context impl MySQLImpl.
INFO [alembic.runtime.migration] Will assume non-transactional DDL.
Done.

TypeError: b’5e36be93294a6fea65a4c81571388241b1667fca’ is not JSON serializable

1
2
3
4
5
6
7
8
9
10
11
12
13
14
15
16
17
18
19
20
21
22
23
24
25
26
27
28
29
30
31
32
33
34
35
36
37
38
39
40
41
42
43
44
45
46
47
48
49
50
51
52
53
54
55
56
57
58
59
60
61
62
63
64
65
66
67
68
69
70
71
72
73
74
75
76
77
78
79
80
81
82
83
84
85
86
87
88
89
90
91
Ooops.

____/ ( ( ) ) \___
/( ( ( ) _ )) ) )\
(( ( )( ) ) ( ) )
((/ ( _( ) ( _) ) ( () ) )
( ( ( (_) (( ( ) .((_ ) . )_
( ( ) ( ( ) ) ) . ) ( )
( ( ( ( ) ( _ ( _) ). ) . ) ) ( )
( ( ( ) ( ) ( )) ) _)( ) ) )
( ( ( \ ) ( (_ ( ) ( ) ) ) ) )) ( )
( ( ( ( (_ ( ) ( _ ) ) ( ) ) )
( ( ( ( ( ) (_ ) ) ) _) ) _( ( )
(( ( )( ( _ ) _) _(_ ( (_ )
(_((__(_(__(( ( ( | ) ) ) )_))__))_)___)
((__) \\||lll|l||/// \_))
( /(/ ( ) ) )\ )
( ( ( ( | | ) ) )\ )
( /(| / ( )) ) ) )) )
( ( ((((_(|)_))))) )
( ||\(|(|)|/|| )
( |(||(||)|||| )
( //|/l|||)|\\ \ )
(/ / // /|//||||\\ \ \ \ _)
-------------------------------------------------------------------------------
Node: ubuntu
-------------------------------------------------------------------------------
Traceback (most recent call last):
File "/home/ubuntu/.local/lib/python3.5/site-packages/flask/app.py", line 1982, in wsgi_app
response = self.full_dispatch_request()
File "/home/ubuntu/.local/lib/python3.5/site-packages/flask/app.py", line 1614, in full_dispatch_request
rv = self.handle_user_exception(e)
File "/home/ubuntu/.local/lib/python3.5/site-packages/flask/app.py", line 1517, in handle_user_exception
reraise(exc_type, exc_value, tb)
File "/home/ubuntu/.local/lib/python3.5/site-packages/flask/_compat.py", line 33, in reraise
raise value
File "/home/ubuntu/.local/lib/python3.5/site-packages/flask/app.py", line 1612, in full_dispatch_request
rv = self.dispatch_request()
File "/home/ubuntu/.local/lib/python3.5/site-packages/flask/app.py", line 1598, in dispatch_request
return self.view_functions[rule.endpoint](**req.view_args)
File "/home/ubuntu/.local/lib/python3.5/site-packages/flask_admin/base.py", line 69, in inner
return self._run_view(f, *args, **kwargs)
File "/home/ubuntu/.local/lib/python3.5/site-packages/flask_admin/base.py", line 368, in _run_view
return fn(self, *args, **kwargs)
File "/home/ubuntu/.local/lib/python3.5/site-packages/flask_login.py", line 755, in decorated_view
return func(*args, **kwargs)
File "/home/ubuntu/.local/lib/python3.5/site-packages/airflow/utils/db.py", line 74, in wrapper
return func(*args, **kwargs)
File "/home/ubuntu/.local/lib/python3.5/site-packages/airflow/www/views.py", line 2061, in index
auto_complete_data=auto_complete_data)
File "/home/ubuntu/.local/lib/python3.5/site-packages/flask_admin/base.py", line 308, in render
return render_template(template, **kwargs)
File "/home/ubuntu/.local/lib/python3.5/site-packages/flask/templating.py", line 134, in render_template
context, ctx.app)
File "/home/ubuntu/.local/lib/python3.5/site-packages/flask/templating.py", line 116, in _render
rv = template.render(context)
File "/home/ubuntu/.local/lib/python3.5/site-packages/jinja2/environment.py", line 989, in render
return self.environment.handle_exception(exc_info, True)
File "/home/ubuntu/.local/lib/python3.5/site-packages/jinja2/environment.py", line 754, in handle_exception
reraise(exc_type, exc_value, tb)
File "/home/ubuntu/.local/lib/python3.5/site-packages/jinja2/_compat.py", line 37, in reraise
raise value.with_traceback(tb)
File "/home/ubuntu/.local/lib/python3.5/site-packages/airflow/www/templates/airflow/dags.html", line 18, in top-level template code
{% extends "airflow/master.html" %}
File "/home/ubuntu/.local/lib/python3.5/site-packages/airflow/www/templates/airflow/master.html", line 18, in top-level template code
{% extends "admin/master.html" %}
File "/home/ubuntu/.local/lib/python3.5/site-packages/airflow/www/templates/admin/master.html", line 18, in top-level template code
{% extends 'admin/base.html' %}
File "/home/ubuntu/.local/lib/python3.5/site-packages/flask_admin/templates/bootstrap3/admin/base.html", line 74, in top-level template code
{% block tail_js %}
File "/home/ubuntu/.local/lib/python3.5/site-packages/airflow/www/templates/admin/master.html", line 44, in block "tail_js"
xhr.setRequestHeader("X-CSRFToken", "{{ csrf_token() }}");
File "/home/ubuntu/.local/lib/python3.5/site-packages/flask_wtf/csrf.py", line 47, in generate_csrf
setattr(g, field_name, s.dumps(session[field_name]))
File "/home/ubuntu/.local/lib/python3.5/site-packages/itsdangerous/serializer.py", line 166, in dumps
payload = want_bytes(self.dump_payload(obj))
File "/home/ubuntu/.local/lib/python3.5/site-packages/itsdangerous/url_safe.py", line 42, in dump_payload
json = super(URLSafeSerializerMixin, self).dump_payload(obj)
File "/home/ubuntu/.local/lib/python3.5/site-packages/itsdangerous/serializer.py", line 133, in dump_payload
return want_bytes(self.serializer.dumps(obj, **self.serializer_kwargs))
File "/home/ubuntu/.local/lib/python3.5/site-packages/itsdangerous/_json.py", line 18, in dumps
return json.dumps(obj, **kwargs)
File "/usr/lib/python3.5/json/__init__.py", line 237, in dumps
**kw).encode(obj)
File "/usr/lib/python3.5/json/encoder.py", line 198, in encode
chunks = self.iterencode(o, _one_shot=True)
File "/usr/lib/python3.5/json/encoder.py", line 256, in iterencode
return _iterencode(o, 0)
File "/usr/lib/python3.5/json/encoder.py", line 179, in default
raise TypeError(repr(o) + " is not JSON serializable")
TypeError: b'5e36be93294a6fea65a4c81571388241b1667fca' is not JSON serializable

这个错误十分诡异,至今不解,项目运行环境为 Python 3.5.2

连首页都进不去,使用的地址为 127.0.0.1:8080,后面尝试把地址修改为 localhost:8080 ,就没有这个报错了 Orz


了解更多

Airflow: a workflow management platform

What we learned migrating off Cron to Airflow

首先,我们有一个数据量很大的表。其次,对他进行条件查询或其他操作就像看着一只小蜗牛在爬。

是可忍,孰不可忍!

0x01 原理

关于分区为什么能提升查询速度,这就值得你仔细想想了。

既然 hive 基于文件系统,那么我们可以把它类比成很多个桶。

假设现在有 100 个桶,分别存放不同的海鲜,其中 2 个桶里有我们想要的桂花鱼,1 个桶里有阿根廷大红虾,那如何才能在最快的速度找出这 3 个桶?

按照默认的策略,人们会打开盖子一桶一桶找,而如果有 1000、10000 个桶,就会从一个人找演变成一群人一起找。

有没有改进方式呢?有。

有一天老板发现,不对啊,这个事我居然叫那么多人来做,感觉自己额外付出了很多成本,亏钱了。不行!这个事情必须改革!于是他思前想后好几天怎么也也想不到更好的办法,也因此懊恼了许久。直到有一天,老板夫人得了风寒,老板十分心急,替夫人去药铺抓药,当它看见郎中拿着方子在药柜抓药的时候,心中的郁结终于揭开了。拍了拍脑瓜子,大叫了声,对呀!我怎么没想到呢!

于是,从药铺回来后,老板更改了新的存鱼策略。它让员工们把鱼放进桶里的同时,在桶外贴上标签,取鱼的时候只需要远远地扫一眼就能快速定位。

hive 也是如此,你可以粗略地将它的存储系统理解为,将一堆文件放在同一个文件夹里,需要的时候在这堆文件里遍历,最后的效果不言而喻。

分区的好处便是,将文件按一定的维度,存进不同的文件夹,相当于给他们打好了标签,这样我按这个维度搜索时,便不需要遍历其他无关的文件。数据越多,对查询效率的提升就越大。

0x02 操作一波

首先看分区列表,如果结果为空就表示该表下没有分区。

1
show partitions tmp.tmp_user;

给当前表添加分区

1
alter table tmp.tmp_user add partition (month='2018_10', day='25') location '/user/amos/tmp_user/month=2018_10/day=25';

将数据迁移至分区中

1
$ hdfs dfs -mv /user/amos/tmp_user/data_20181025.csv /user/amos/tmp_user/month=2018_10/day=25

物极必反

为了提升搜索效果,增加分区数是可以的,但是如果分区数太过庞大,而需查询的数据也很多的话,分区带来的提升会被弱化。尤其是在分区中数据较为分散的时候,只要查询数据量达到一定量级便会轻易集中所有分区。

大量分区带来的不良后果不仅如此,还会在查询之后给磁盘带来更多的小文件。

说点题外话

如果是对数据仓库进行优化

hive 中,有几种办法

  • 分区
  • 分桶
  • 索引
  • 区分活跃用户
  • 更改数据结构(id - string –> id - list)

前言

为了加强网站安全性,给除了登录注册等特殊页面外的页面路由都加上了访问控制。然后问题就出现了,接口请求没有返回值了!抛了这样一个错误:

1
Request header field 8080:1 Authorization is not allowed by Access-Control-Allow-Headers in preflight response

之前的跨域设置居然不管用了!

挣扎

分析拦截器代码

看看这个拦截器代码究竟做了什么!

1
2
3
4
5
6
7
8
9
10
11
12
13
14
15
16
17
18
19
20
21
22
23
24
25
26
27
28
29
30
31
// http request 拦截器
axios.interceptors.request.use(
config => {
if (store.state.token) { // 判断是否存在token,如果存在的话,则每个http header都加上token
config.headers.Authorization = `token ${store.state.token}`;
}
return config;
},
err => {
return Promise.reject(err);
});

// http response 拦截器
axios.interceptors.response.use(
response => {
return response;
},
error => {
if (error.response) {
switch (error.response.status) {
case 401:
// 返回 401 清除token信息并跳转到登录页面
store.commit(types.LOGOUT);
router.replace({
path: 'login',
query: {redirect: router.currentRoute.fullPath}
})
}
}
return Promise.reject(error.response.data) // 返回接口返回的错误信息
});

嗯!debugger一波找到原因在第五行,添加了一个新的请求头Authorization

1
config.headers.Authorization = `token ${store.state.token}`;

然而,在前端的请求中并没有看到Authorization这个头。。

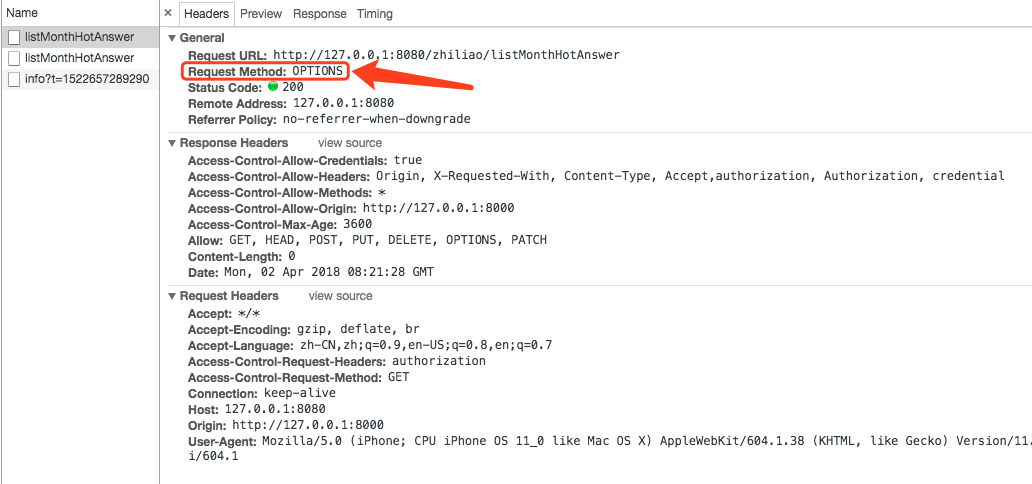
分析请求

在查看请求详情的时候发现一条重要信息:

options request

options请求过后没有请求接口,那么就证明是服务端拒绝了访问。

跨域资源共享标准新增了一组 HTTP 首部字段,允许服务器声明哪些源站有权限访问哪些资源。另外,规范要求,对那些可能对服务器数据产生副作用的 HTTP 请求方法(特别是 GET 以外的 HTTP 请求,或者搭配某些 MIME 类型的 POST 请求),浏览器必须首先使用 OPTIONS 方法发起一个预检请求(preflight request),从而获知服务端是否允许该跨域请求。服务器确认允许之后,才发起实际的 HTTP 请求。在预检请求的返回中,服务器端也可以通知客户端,是否需要携带身份凭证(包括 Cookies 和 HTTP 认证相关数据)。

— 来自 MDN web docs

填坑

解决的办法也很简单,在服务端的跨域拦截器中给OPTIONS方法放行。

1
2
3
4
5
6
7
// 新增一个 Authorization 请求头
response.setHeader("Access-Control-Allow-Headers", "Origin, X-Requested-With, Content-Type, Accept, Authorization");

// 放行 OPTIONS 请求方法
if (request.getMethod().equals("OPTIONS")) {
response.setStatus(HttpServletResponse.SC_OK);
}

服务端放行OPTIONS方法后,再次请求,就可以看到同一个请求发送了两次。第一条为 options 方法,第二条请求就是 post 或 get 请求啦,并且在 header 中也可以看到 axios 拦截器设置的 Authorization 了。


参考链接

axios 登录拦截器

Access control CORS

简单介绍 Docker

Docker 真是个好东西,很好的降低了不同环境发版的兼容性问题。无论是 Linux, Windows 或是 Mac OS,再也不用怕系统环境不同,软件版本不同导致的项目无法启动。这些问题只需要自定义 Docker 镜像,并在 Docker 中启动,就能搞定部署啦。

部署 Vue 项目

传统的部署一般为编译后放在 Nginx 目录下,或者放在 Tomcat 目录下。玩了有一阵子 Docker 了,就试试用 Docker 来部署吧。

本地操作

首先给本地的vue项目打包

1
npm run build

执行命令之后项目根目录下会出现 dist 文件夹,将其上传至服务器。

服务器操作

编写 Dockerfile

新建 Dockerfile

vi Dockerfile

1
2
3
4
5
6
7
8
9
10
#导入nginx镜像
FROM nginx:1.13.7
MAINTAINER amosannn <amosannn@gmail.com>
#把当前打包工程的html复制到虚拟地址
COPY dist/ /usr/share/nginx/html/
#使用自定义nginx.conf配置端口和监听
RUN rm /etc/nginx/conf.d/default.conf
ADD default.conf /etc/nginx/conf.d/

RUN /bin/bash -c 'echo init ok!!!'

Nginx配置

新建default.conf

vi default.conf

1
2
3
4
5
6
7
8
9
10
11
12
13
14
15
16
17
18
19
20
21
22
server {
# 项目中定义的端口号
listen 8000;
server_name localhost;

#charset koi8-r;
#access_log /var/log/nginx/log/host.access.log main;

location / {
root /usr/share/nginx/html;
index index.html index.htm;
}

#error_page 404 /404.html;

# redirect server error pages to the static page /50x.html
#
error_page 500 502 503 504 /50x.html;
location = /50x.html {
root html;
}
}

Docker 打包

打包前项目目录下应该有这几个文件(夹):default.conf, dist,Dockerfile

1
docker build -t zhiliao:v1 .

别忘了末尾的小点点

最后出现这两条提示即为打包成功

1
2
Successfully built 6f656946fde3
Successfully tagged zhiliao:v1

查看镜像

1
docker images

如果在结果中看到,则为打包成功

1
2
REPOSITORY          TAG                 IMAGE ID            CREATED             SIZE
zhiliao latest c5d9c47be079 17 minutes ago 111MB

运行

1
docker run -d -p 80:8000 zhiliao:v1

命令中的-d意为后台运行

-p 为端口号,前半部分为外网访问的端口,后半部分为 Nginx 反向代理寻找的内部端口

查看运行结果

1
docker ps 

这条命令等价于docker container ls,加上 -a 则可显示全部

1
2
3
[root@VM_108_54_centos zhiliao-vue]# docker ps -a
CONTAINER ID IMAGE COMMAND CREATED STATUS PORTS NAMES
bdd5842a4cae zhiliao:v1 "nginx -g 'daemon ..." 42 seconds ago Exited (1) 41 seconds ago frosty_joliot

查找日志

如果遇到程序崩溃或者镜像启动失败

1
docker logs 'CONTAINER ID'

使用 ps 命令可以找到到 CONTAINER ID

1
2
3
[root@VM_108_54_centos zhiliao-vue]# docker logs bdd5842a4cae
2018/03/28 07:11:51 [emerg] 1#1: unknown directive "//这里使用项目中的端口号" in /etc/nginx/conf.d/default.conf:3
nginx: [emerg] unknown directive "//这里使用项目中的端口号" in /etc/nginx/conf.d/default.conf:3

参考链接:

使用 Dockerfile 定制镜像

前言

用Vue写了几个页面,发现request传到后端没带上cookies,心想不对劲,Postman明明可以访问啊。再仔细看看,后端已经开放了跨域访问,不需要HttpServletRequest的接口也可以成功请求。一定就是前端请求缺少请求头或是某些参数了。上网查了一下还真是这样,又跳过了一个坑,很开心啦~

前后端跨域设置

Vue

main.js 设置

1
2
3
4
import axios from 'axios'

axios.defaults.withCredentials=true;
Vue.prototype.$http = axios;

请求需带上withCredentials

1
2
3
4
5
6
7
8
9
10
11
12
13
getData() {
this.$axios.get('http://127.0.0.1:8080/xxx/xxxxx',{
headers: {
"Content-Type":"application/json;charset=utf-8"
},
withCredentials : true
}).then( (response) => {
if( response.data.code === '0000'){
this.items = response.data.data.xxx;
console.log(this.items)
}
})
}

SpringMVC

加上一个跨域用Interceptor

1
2
3
4
5
6
7
8
9
10
11
12
13
14
15
16
17
18
19
20
21
22
23
24
@Component
public class CorsInterceptor implements HandlerInterceptor {

@Override
public boolean preHandle(HttpServletRequest request, HttpServletResponse response,
Object handler) throws Exception {
response.setHeader("Access-Control-Allow-Origin", "*");
response.setHeader("Access-Control-Allow-Methods", "*");
response.setHeader("Access-Control-Max-Age", "3600");
response.setHeader("Access-Control-Allow-Headers", "Origin, X-Requested-With, Content-Type, Accept");
response.setHeader("Access-Control-Allow-Credentials","true"); //是否允许浏览器携带用户身份信息(cookie)
return true;
}

@Override
public void postHandle(HttpServletRequest httpServletRequest, HttpServletResponse httpServletResponse, Object o, ModelAndView modelAndView) throws Exception {

}

@Override
public void afterCompletion(HttpServletRequest httpServletRequest, HttpServletResponse httpServletResponse, Object o, Exception e) throws Exception {

}
}

可能遇到的问题

1
response.setHeader("Access-Control-Allow-Origin", "*");

请求源地址如果写了*很可能会被拒绝访问。

1
Failed to load http://127.0.0.1:8080/zhiliao/login: Response to preflight request doesn't pass access control check: The value of the 'Access-Control-Allow-Origin' header in the response must not be the wildcard '*' when the request's credentials mode is 'include'. Origin 'http://127.0.0.1:8000' is therefore not allowed access. The credentials mode of requests initiated by the XMLHttpRequest is controlled by the withCredentials attribute.

如果出现这样的报错,那就得指定地址啦!

1
response.setHeader("Access-Control-Allow-Origin", "http://127.0.0.1:8000");

这里依旧有个小坑:指定地址为http://127.0.0.1:8000的时候前端页面若是localhost是无法访问的。

看看axios官方文档

axios官方配置说明

1
2
3
4
5
6
7
8
9
10
11
12
13
// `timeout` specifies the number of milliseconds before the request times out.
// If the request takes longer than `timeout`, the request will be aborted.
timeout: 1000,

// `withCredentials` indicates whether or not cross-site Access-Control requests
// should be made using credentials
withCredentials: false, // default

// `adapter` allows custom handling of requests which makes testing easier.
// Return a promise and supply a valid response (see lib/adapters/README.md).
adapter: function (config) {
/* ... */
},

配置文件中withCredentials默认是关闭的,手动修改配置文件或在项目中重定义即可。

简单说一下事务

事务就是单个逻辑执行的一系列操作,要么全部成功,要么全部失败。
事务包含4个特性(ACID):

  1. Atomicity(原子性):事务中包含的所有操作要么全做,要么全不做。
  2. Consistency(一致性):事务开始以前,数据库处于一致性的状态,事务结束后,数据库也必须处于一致性的状态。
  3. Isolation(隔离性):系统必须保证事务不受其他并发执行的事务的影响。
  4. Durability(持久性):一个事务一旦成功完成,它对数据库的改变必须是永久的,即使是在系统遇到故障的情况下也不会丢失。

假如没有事务

我们以银行的ATM机为例子:

取款操作一般为两个核心步骤:

  1. 余额扣除相应金额
  2. ATM机吐钞

如果金额扣除了,而ATM机却因某些原因无法吐钞,那用户就崩溃了。而若是金额没扣除,ATM却吐钞了,那就是银行崩溃了。所以事务(分布式)的重要性在这里就体现的淋漓尽致了,这也正是事务中的一致性。

说说分布式事务

分布式事务的体现有很多种,其中最具代表性的是由Oracle Tuxedo系统提出的XA分布式事务协议。

XA协议包含两阶段提交(2PC)三阶段提交(3PC两种实现。

两阶段提交(2PC)

两阶段提交就像支持多人游戏的网游游戏模式(可参考近日火热的PUBG)。

在游戏开始前,一个队伍中会有两种角色,队长与队员,也分别对应着事务协调者事务参与者

正向流程

一个XA两阶段提交的正向流程分为这两阶段:

第一阶段:

  1. 以发送邀请的玩家A为首,邀请到了呵自己开黑的小伙伴B、C、D进入队伍,并请求他们点击准备按钮。
  2. 小伙伴 B、C、D 全部准备就绪。

第二阶段:

  1. A 大吼一声,「伞兵一号准备就绪!」随即点击开始游戏。
  2. A 首先进入游戏,等待 B、C、D片刻后,大家都成功进入游戏地图。

对应到正经的XA中是这样的:

第一阶段:

  1. 协调者向参与者们发送Prepare请求

  2. 参与者们各自执行自己与事务有关的数据更新,写入Undo Log和Redo Log。如果参与者执行成功,暂时不提交事务,而是向事务协调节点返回“Done”消息。

    当事务协调者接到了所有参与者的返回消息,整个分布式事务将会进入第二阶段。

第二阶段:

  1. 如果事务协调节点在之前所收到都是正向返回,那么它将会向所有事务参与者发出Commit请求。
  2. 接到Commit请求之后,事务参与者节点会各自进行本地的事务提交,并释放锁资源。当本地事务完成提交后,将会向事务协调者返回“ACK”消息。
  3. 事务协调者接收到所有事务参与者的“完成”反馈,整个分布式事务完成。

失败处理

  1. 如果某个事务参与者反馈失败消息,说明该节点的本地事务执行不成功,必须回滚。
  2. 于是在第二阶段,事务协调节点向所有的事务参与者发送Abort请求。接收到Abort请求之后,各个事务参与者节点需要在本地进行事务的回滚操作,回滚操作依照Undo Log来进行。

XA两阶段提交的不足

性能问题

XA协议遵循强一致性。在事务执行过程中,各个节点占用着数据库资源,只有当所有节点准备完毕,事务协调者才会通知提交,参与者提交后释放资源。这样的过程有着非常明显的性能问题。

协调者单点故障问题

事务协调者是整个XA模型的核心,一旦事务协调者节点挂掉,参与者收不到提交或是回滚通知,参与者会一直处于中间状态无法完成事务。

丢失消息导致的不一致问题

在XA协议的第二个阶段,如果发生局部网络问题,一部分事务参与者收到了提交消息,另一部分事务参与者没收到提交消息,那么就导致了节点之间数据的不一致。

如何避免XA两阶段提交的种种问题

有许多其他的分布式事务方案可供选择:

XA三阶段提交

XA三阶段提交在两阶段提交的基础上增加了CanCommit阶段,并且引入了超时机制。一旦事物参与者迟迟没有接到协调者的commit请求,会自动进行本地commit。这样有效解决了协调者单点故障的问题。但是性能问题和不一致的问题仍然没有根本解决。

MQ事务

利用消息中间件来异步完成事务的后一半更新,实现系统的最终一致性。这个方式避免了像XA协议那样的性能问题。

TCC事务

TCC事务是Try、Commit、Cancel三种指令的缩写,其逻辑模式类似于XA两阶段提交,但是实现方式是在代码层面来人为实现。

前言

本着更深入地使用注解来开发,慢慢地发现脱离了XML的MyBatis好多好多的坑。我觉得很大的原因还是来自于官方文档的不完善,以及使用注解开发持久层的人并不多见,导致网络上的相关讨论过于贫瘠并重复化,毕竟对于复杂查询的支持,我认为还没有在XML里写一条SQL方便呢~

所以这篇文章用于补充一语带过的官方文档,记录下自己趟过的坑。

正文

一对一映射

注解化一对一映射其实就是将XML中的ResultType属性对应的实体写在@Results注解中。其中的@Result填入实体的属性,而若该属性为实体中的实体,则需要@One注解引入。

1
2
3
4
5
6
7
8
9
10
11
12
@Select("select answer_id, answer_content, liked_count, create_time, question_id, user_id from answer where create_time > #{createTime} order by liked_count desc, create_time desc limit 0,10")
@Results({
@Result(id = true, column = "answer_id", property = "answerId", javaType = Integer.class),
@Result(column = "answer_content", property = "answerContent"),
@Result(column = "liked_count", property = "likedCount", javaType = Integer.class, jdbcType = JdbcType.INTEGER),
@Result(column = "create_time", property = "createTime"),
@Result(column = "question_id", property = "question", javaType = Question.class,
one = @One(select = "selectQuestionById")),
@Result(column = "user_id", property = "user",
one = @One(select = "selectUserById"))
})
List<Answer> listAnswerByCreateTime(@Param("createTime") long createTime);

值得注意的是,映射中的property属性的值不可和其他实体属性一样,应该填写所返回的实体名称。

例如下面代码,我返回的实体为Answer类下的Question类,则property中不可写questionId,而得写question。同时@One中select属性对应的方法若在不同类,则需要写出完整的包名(com.xxx.xxx.getxxxByxx)。

1
2
@Result(column = "question_id", property = "question", javaType = Question.class,
one = @One(select = "selectQuestionById"))

需要注意的是,从@One传递过来的查询条件也需要在主查询语句中查询出来,也就是上面的listAnswerByCreateTime方法需要查询出question_id和user_id,千万别漏了。否则报你错哦!

1
2
3
4
5
6
7
@Select("select question_id, question_title from question where question_id = #{questionId}")
@ResultType(Question.class)
Question selectQuestionById(@Param("questionId") Integer questionId);

@Select("select user_id, username, avatar_url, simple_desc from user where user_id = #{userId}")
@ResultType(User.class)
User selectUserById(@Param("userId") Integer userId);

由此查询得出的结果集为

1
2
3
4
5
6
7
8
9
10
11
12
13
14
15
16
17
18
19
20
21
22
23
24
25
26
27
28
29
"answerList": [
{
"answerId": 42,
"answerContent": "这是回答!",
"likedCount": 3,
"createTime": 1520508016650,
"userId": null,
"questionId": null,
"likeState": null,
"commentCount": null,
"question": {
"questionId": 1,
"questionTitle": "Spring,Django,Rails,Express这些框架技术的出现都是为了解决什么问题,现在这些框架都应用在哪些方面?",
"createTime": null,
"userId": null,
"user": null
},
"user": {
"userId": 11218,
"weiboUserId": null,
"email": null,
"username": "amosamos",
"password": null,
"joinTime": null,
"avatarUrl": "https://avatars3.githubusercontent.com/u/16012509?s=400&u=6fe0dd08943216aeff2d3c9d1b8c3e602f6de8e9&v=4"
},
"answerCommentList": null
}
]

最近开发中尝试使用注解来代替xml完成Mybatis的sql编写,实现更完(装)整(逼)的无xml编程。结果没写多久就跌进大坑了Orz

总所周知的是Mybatis支持的注解中有@Select、@Insert、@Update、@Delete这四个基本操作。使用这些注解你可以非常快的完成基础操作,如果想执行一些复杂操作,例如包含where、foreach等xml中一个标签即可完成的操作,便需要用到另一个注解 –> @SelectProvider

如果你的需求只是传递一些基础类型,那你学习使用SelectProvider的曲线还是很平滑的。如果你的需求是传递一些复杂类型,例如List,那就可能会尴尬了。

1
2
3
4
5
@Mapper
public interface QuestionMapper {
@SelectProvider(type = QuestionSqlProvider.class, method = "listQuestionByQuestionId")
List<Question> listQuestionByQuestionId(@Param("idList") List<Integer> idList);
}

一开始我理所当然的把List作为输入参数。

1
2
3
4
5
6
7
8
9
10
11
12
13
14
15
public String listQuestionByQuestionId(final List<Integer> idList) {
StringBuilder sb = new StringBuilder();
sb.append("(");
for (Integer questionId : idList) {
sb.append(" '" + questionId + "',");
}
sb.deleteCharAt(sb.length() - 1);
sb.append(")");
System.out.println(sb.toString());
return new SQL() {{
SELECT(" question_id,question_title,create_time ");
FROM(" question ");
WHERE(" question_id in " + sb.toString());
}}.toString();
}

燃鹅。。jvm很无情的抛了个错误出来

1
2
00:29:39.814 [http-nio-8080-exec-1] DEBUG o.s.web.servlet.DispatcherServlet - Could not complete request
org.mybatis.spring.MyBatisSystemException: nested exception is org.apache.ibatis.builder.BuilderException: Error invoking SqlProvider method (com.amosannn.mapper.QuestionSqlProvider.listQuestionByQuestionId). Cause: org.apache.ibatis.binding.BindingException: Parameter 'arg0' not found. Available parameters are [idList, param1]

很难受,Mybatis的官方文档里并没有针对@SelectProvider有更多的demo,翻遍了各大门户网站也没见到有相关的讨论。兜兜转转依旧没有眉目,想到多参数的传递会被Mybatis自动封装进Map,该不会List也是同样被封装进Map吧。结果一试还真是这样。。

终于摸索出问题的关键,只需把形参由List类型替换为Map类型就能接收到前面传来的List了。

1
2
3
4
5
6
7
8
9
10
11
12
13
14
15
16
17
18
public class QuestionSqlProvider {
public String listQuestionByQuestionId(final Map<String, Object> map) {
List<Integer> idList = (List<Integer>)map.get("idList");
StringBuilder sb = new StringBuilder();
sb.append("(");
for (Integer questionId : idList) {
sb.append(" '" + questionId + "',");
}
sb.deleteCharAt(sb.length() - 1);
sb.append(")");
System.out.println(sb.toString());
return new SQL() {{
SELECT(" question_id,question_title,create_time ");
FROM(" question ");
WHERE(" question_id in " + sb.toString());
}}.toString();
}
}